 Kubernetes Python Client
# Kubernetes Python Client
# 概述
1.Python kubernetes库的使用
单个 Docker通 常并不能完成我们的日常任务,我们需要多个 Docker 协同工作,这时就需要一些容器编排工具,简单来说就是一些管理容器的工具。现阶段,Google 公司提供的 kubernetes 是最流行的容器编排管理工具,本节将介绍该工具的使用。
我们介绍的工具叫作 kubernetes-client。这个软件包是 kubernetes 团队提供的,更新速度还是不错的。其他类似的开发包也有一些,它们提供各自不同风格的接口,但是我们这里不打算介绍,仅仅关注 kubernetes-client 这个软件包。
由于 kubernetes 涉及的概念和内容非常多,一些基础的知识这里就直接跳过了,例如如何搭建一个kubernetes集群,如何设置集群用户等,所以本节内容适合有一定 kubernetes 操作经验的人阅读。
使用Python访问K8s的集群,调用相对于的API接口有两种方法,一种是使用Token,一种是使用config文件。
2.Kubernetes官方库项目地址:
Kubernetes官方维护的Python客户端client-python, 地址:https://github.com/kubernetes-client/python
# 🏷️安装模块
$ pip3 install kubernetes
# 🏷️环境说明
| 操作系统 | Centos7.9 |
|---|---|
| K8s版本 | 1.23.5 |
| IP地址 | 10.11.121.111 |
| 主机名称 | k8s-master |
# 获取API与token
# 1.获取Cluster URL地址
$ APISERVER=$(kubectl config view --minify | grep server | cut -f 2- -d ":" | tr -d " ")
$ echo $APISERVER
https://10.11.121.111:6443
# 2.创建k8s admin-token
使用clusterrolebinding和SA绑定一个admin的角色。
[root@k8s-master ~]# cat admin-token.yaml
kind: ClusterRoleBinding
apiVersion: rbac.authorization.k8s.io/v1beta1
metadata:
  name: admin
  annotations:
    rbac.authorization.kubernetes.io/autoupdate: "true"
roleRef:
  kind: ClusterRole
  name: cluster-admin
  apiGroup: rbac.authorization.k8s.io
subjects:
- kind: ServiceAccount
  name: admin
  namespace: kube-system
---
apiVersion: v1
kind: ServiceAccount
metadata:
  name: admin
  namespace: kube-system
  labels:
    kubernetes.io/cluster-service: "true"
    addonmanager.kubernetes.io/mode: Reconcile
# 3.获取token值
通过以上创建好的权限,查看当前的Token,最后将token与APISERVER地址返回内容复制到python client主机上, 供脚本使用.
[root@k8s-master ~]#  kubectl describe secret/$(kubectl get secret -nkube-system |grep admin|awk '{print $1}') -nkube-system|grep token:
token:      eyJhbGciOiJSUzI1NiIsImtpZCI6IndfU2t4TmtWbVBraHFDTWctWDAyb2NnTzBoQXVPemhXbEJaN3hHS3lrRnMifQ.eyJpc3MiOiJrdWJlcm5ldGVzL3NlcnZpY2VhY2NvdW50Iiwia3ViZXJuZXRlcy5pby9zZXJ2aWNlYWNjb3VudC9uYW1lc3BhY2UiOiJrdWJlLXN5c3RlbSIsImt1YmVybmV0ZXMuaW8vc2VydmljZWFjY291bnQvc2VjcmV0Lm5hbWUiOiJhZG1pbi10b2tlbi1yN3N3cSIsImt1YmVybmV0ZXMuaW8vc2VydmljZWFjY291bnQvc2VydmljZS1hY2NvdW50Lm5hbWUiOiJhZG1pbiIsImt1YmVybmV0ZXMuaW8vc2VydmljZWFjY291bnQvc2VydmljZS1hY2NvdW50LnVpZCI6ImJiM2U3ZWNmLWU5ODYtNGI5OS05ZmJkLTkzZDI5OTMzNTkzMyIsInN1YiI6InN5c3RlbTpzZXJ2aWNlYWNjb3VudDprdWJlLXN5c3RlbTphZG1pbiJ9.Bjc6sNWx_ag_sEr1dDA7Ln1Fg6hl1Cuyns4fad-aqxlJJnixdtoFod-AGZ6lgs6dcXP8lJ1sSHKp9d4xLsGvhZPLKS6OF0jAFNzRWtw_scFQIMboeiTkTZOVJcxJXjOglcxtNrrAii-N5yyQxbjuKSwGmjZbdt56jKZ9sye1WLvLBNBgaY7eAmDmOVd_UnFSE9IaNzBRE8a6sl2cEC45BRPlwQXZr4ogRLwvM794Y0P-8KkjBZ4wV2SkHpTOEtxM-FWpPiQJwcFJgpHp0dx8YTCZttKJK8f-JD_HiGlNf83EGlOkocHviwzMSZdteXU0numAUnSuS_2HpksdCn0N2g
# 在python client主机上编写脚本
# 1.创建目录结构
这里我们获取的token会引入到我们的脚本下, 作为bearer authorization的api key与远程k8s API建立认证连接.
$ mkdir -p /kube/auth
$ cd /kube/auth
$ vim token.txt
# 2.编写python client脚本
# 获取的命名空间
from kubernetes import client,config

class KubernetesTools(object):
    def __init__(self):
        self.k8s_url = 'https://10.11.121.111:6443'

    def get_token(self):
        """
        获取token
        :return:
        """
        with open('token.txt', 'r') as file:
            Token = file.read().strip('\n')
            return Token

    def get_api(self):
        """
        获取API的CoreV1Api版本对象
        :return:
        """
        configuration = client.Configuration()
        configuration.host = self.k8s_url
        configuration.verify_ssl = False
        configuration.api_key = {"authorization": "Bearer " + self.get_token()}
        client1 = client.ApiClient(configuration=configuration)
        api = client.CoreV1Api(client1)
        return api

    def get_namespace_list(self):
        """
        获取命名空间列表
        :return:
        """
        api = self.get_api()
        namespace_list = []
        for ns in api.list_namespace().items:
            # print(ns.metadata.name)
            namespace_list.append(ns.metadata.name)

        return namespace_list

if __name__ == '__main__':
    namespace_list = KubernetesTools().get_namespace_list()
    print(namespace_list)
执行输出:
['default', 'istio-system', 'kube-node-lease', 'kube-public', 'kube-system']
注意:输出时,会有一段警告信息
InsecureRequestWarning: Unverified HTTPS request is being made to host '192.168.31.74'. Adding certificate verification is strongly advised. See: https://urllib3.readthedocs.io/en/latest/advanced-usage.html#ssl-warnings
  InsecureRequestWarning,
这个是requests库提示警告,因为我是ip访问的,所以SSL验证会失败。但这个不影响。
# 获取所有services
在上面的代码基础上,再加一个方法
def get_services(self):
        """
        获取所有services
        :return:
        """
        api = self.get_api()
        ret = api.list_service_for_all_namespaces(watch=False)
        for i in ret.items:
            print("%s \t%s \t%s \t%s \t%s \n" % (
                i.kind, i.metadata.namespace, i.metadata.name, i.spec.cluster_ip, i.spec.ports))
单独执行这个方法,会输出很多信息。我这里是kube-system和default的资源。可以看到很多信息,包括service名,svc地址,以及node_port暴露的端口
None 	default 	kubernetes 	10.96.0.1 	[{'app_protocol': None,
 'name': 'https',
 'node_port': None,
 'port': 443,
 'protocol': 'TCP',
 'target_port': 6443}]

None 	kube-system 	kube-dns 	10.96.0.10 	[{'app_protocol': None,
 'name': 'dns',
 'node_port': None,
 'port': 53,
 'protocol': 'UDP',
 'target_port': 53}, {'app_protocol': None,
 'name': 'dns-tcp',
 'node_port': None,
 'port': 53,
 'protocol': 'TCP',
 'target_port': 53}, {'app_protocol': None,
 'name': 'metrics',
 'node_port': None,
 'port': 9153,
 'protocol': 'TCP',
 'target_port': 9153}]
# 获取pod信息
先登录k8s-master,查看目前运行的pod
[root@k8s-master ~]# kubectl get pods
NAME    READY   STATUS    RESTARTS   AGE
nginx   1/1     Running   0          2m41s
在上面的代码基础上,再加一个方法
def get_pod_info(self,namespaces,pod_name):
        """
        查看pod信息
        :param namespaces: 命令空间,比如:default
        :param pod_name: pod完整名称,比如:nginx
        :return:
        """
        api = self.get_api()
        # 示例参数
        namespaces = "default"
        pod_name = "nginx"
        resp = api.read_namespaced_pod(namespace=namespaces,name=pod_name)
        #详细信息
        print(resp)
执行此方法,输出以下信息,由于输出过多,使用...省略
{'api_version': 'v1',
 'kind': 'Pod',
  ...
它会输出一段很长的json,里面包含了此pod的详细信息
# 获取pod日志
在上面的代码基础上,再加一个方法
def get_pod_logs(self,namespaces,pod_name):
        """
        查看pod日志
        :param namespaces: 命令空间,比如:default
        :param pod_name: pod完整名称,比如:nginx
        :return:
        """
        api = self.get_api()
        # 示例参数
        namespaces = "default"
        pod_name = "nginx"
        """
        pretty美化输出
        tail_lines=200输出最近200行
        """
        log_content = api.read_namespaced_pod_log(pod_name, namespaces, pretty=True, tail_lines=200)
        print(log_content)
执行此方法,输出以下信息:
/docker-entrypoint.sh: /docker-entrypoint.d/ is not empty, will attempt to perform configuration
/docker-entrypoint.sh: Looking for shell scripts in /docker-entrypoint.d/
/docker-entrypoint.sh: Launching /docker-entrypoint.d/10-listen-on-ipv6-by-default.sh
10-listen-on-ipv6-by-default.sh: info: Getting the checksum of /etc/nginx/conf.d/default.conf
10-listen-on-ipv6-by-default.sh: info: Enabled listen on IPv6 in /etc/nginx/conf.d/default.conf
/docker-entrypoint.sh: Launching /docker-entrypoint.d/20-envsubst-on-templates.sh
/docker-entrypoint.sh: Launching /docker-entrypoint.d/30-tune-worker-processes.sh
/docker-entrypoint.sh: Configuration complete; ready for start up
2022/04/21 02:48:47 [notice] 1#1: using the "epoll" event method
2022/04/21 02:48:47 [notice] 1#1: nginx/1.21.5
2022/04/21 02:48:47 [notice] 1#1: built by gcc 10.2.1 20210110 (Debian 10.2.1-6)
2022/04/21 02:48:47 [notice] 1#1: OS: Linux 3.10.0-1160.el7.x86_64
2022/04/21 02:48:47 [notice] 1#1: getrlimit(RLIMIT_NOFILE): 1048576:1048576
2022/04/21 02:48:47 [notice] 1#1: start worker processes
2022/04/21 02:48:47 [notice] 1#1: start worker process 32
这个是nginx运行之后,输出的日志信息。
# 使用config文件连接API
# 1.复制config文件
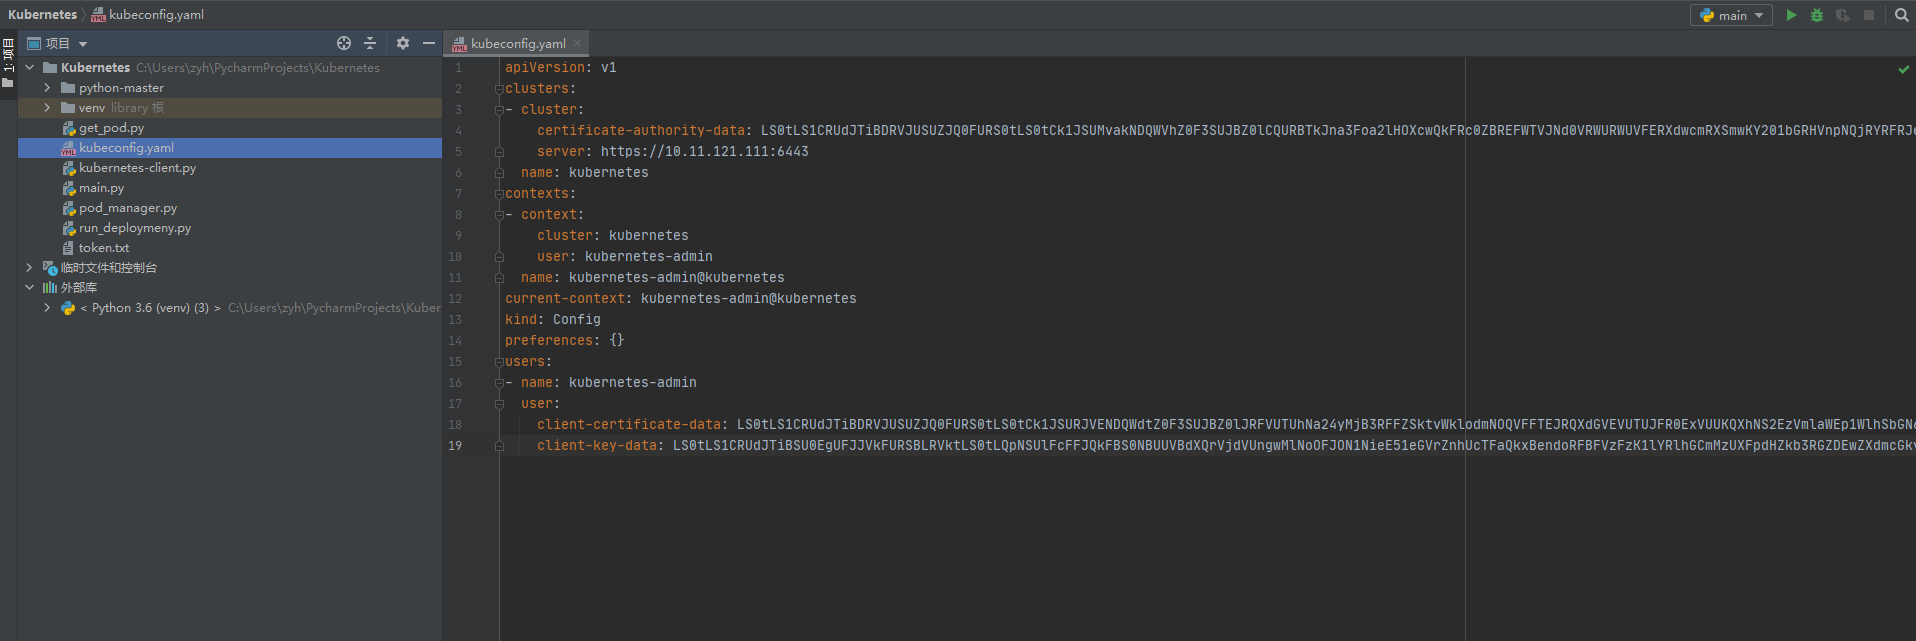
首先我们需要将~/.kube/config文件复制到当前的项目目录下。
[root@k8s-master ~]# cd ~/.kube/
[root@k8s-master .kube]# cat config
apiVersion: v1
clusters:
- cluster:
    certificate-authority-data: LS0tLS1CRUdJTiBDRVJUSUZJQ0FU==
    server: https://10.11.121.111:6443
  name: kubernetes
contexts:
- context:
    cluster: kubernetes
    user: kubernetes-admin
  name: kubernetes-admin@kubernetes
current-context: kubernetes-admin@kubernetes
kind: Config
preferences: {}
users:
- name: kubernetes-admin
  user:
    client-certificate-data: LS0tLS1CRUdJTiBDRVJ==
    client-key-data: LS0tLS1CRUdJTiBSU0EgUFJJVko=
如下是项目文件树:

# 2.编写Python client脚本
# 查看当前的所有Pod
kubernetes 集群本身也有一些系统pod在运行,这些容器主要完成集群的管理工作。下面是完整的代码。
from kubernetes import client, config       # 引入我们要用的包

def get_pod():                              # 定义我们的主函数
    config.load_kube_config(r'kubeconfig.yaml')         # 读入集群相关信息,就是要操作哪个集群
    v1 = client.CoreV1Api()                             # 得到客户端中的一个组接口
                                                        # 查询所有的pod信息
    ret = v1.list_pod_for_all_namespaces(watch=False)
    for i in ret.items:                                 # 遍历得到的pod
        print("%s\t%s\t%s" %                            # 显示pod的IP地址、所属命名空间和名字
              (i.status.pod_ip, i.metadata.namespace, i.metadata.name))
if __name__ == '__main__':                              # 作为脚本时运行
    get_pod()                                           # 运行主程序
运行后的输出结果如下:
10.244.169.136	default	nginx
10.244.36.73	kube-system	calico-kube-controllers-7c845d499-t9zwb
10.11.121.112	kube-system	calico-node-cj8bb
10.11.121.113	kube-system	calico-node-hbkk8
10.11.121.111	kube-system	calico-node-nwrhm
10.244.36.74	kube-system	coredns-6d8c4cb4d-cwvqj
10.244.169.133	kube-system	coredns-6d8c4cb4d-rh786
···
# 监视这些事件
在 kubernetes 中定义了很多事件,如某个 pod 被创建了、某个 pod 被重新部署了等。我们也可以通过代码监视这些事件。下面是一个例子。
from kubernetes import client, config, watch
def event_demo ():
    config.load_kube_config(r'kubeconfig.yaml')           # 得到集群信息
    v1 = client.CoreV1Api()             # 得到接口实例
    count = 10                          # 读取10个事件
    w = watch.Watch()                   # 创建一个监视对象
    for event in w.stream(v1.list_namespace, timeout_seconds=10):
        print("Event: %s %s" % (event['type'], event['object'].
            metadata.name))
        count -= 1                      # 打印事件的类型和名字
        if not count:                   # 如果检测到足够数量的事件,退出循环
            w.stop()
    print("Ended.")                     # 退出循环
if __name__ == '__main__':
    event_demo()
运行后的输入结果如下:
Event: ADDED test123
Event: ADDED gitlab-runner
Event: ADDED kube-system
Event: ADDED kube-public
Event: ADDED kube-node-lease
Event: ADDED default
Ended.
# 查询接口版本
kubernetes 的升级速度很快,所以接口的版本也比较多。我们可以通过查询的方式得到某个集群支持的接口版本和推荐的版本。示例如下:
from kubernetes import client, config
def query_api_ver ():
    config.load_kube_config(r'kubeconfig.yaml')				# 得到集群信息
    print("Supported APIs (* is preferred version):")
    print("%-20s %s" %										# 打印版本信息
          ("core", ",".join(client.CoreApi().get_api_versions().versions)))
    for api in client.ApisApi().get_api_versions().groups:
        versions = []
        for v in api.versions:
            name = ""
            if v.version == api.preferred_version.version and len(
                    api.versions) > 1:
                name += "*"
            name += v.version
            versions.append(name)
        print("%-40s %s" % (api.name, ",".join(versions)))
if __name__ == '__main__':
    query_api_ver()
运行后的输出如下:
Supported APIs (* is preferred version):
core                 v1
apiregistration.k8s.io                   v1
apps                                     v1
events.k8s.io                            *v1,v1beta1
authentication.k8s.io                    v1
authorization.k8s.io                     v1
autoscaling                              *v2,v1,v2beta1,v2beta2
batch                                    *v1,v1beta1
certificates.k8s.io                      v1
networking.k8s.io                        v1
policy                                   *v1,v1beta1
rbac.authorization.k8s.io                v1
storage.k8s.io                           *v1,v1beta1
admissionregistration.k8s.io             v1
apiextensions.k8s.io                     v1
scheduling.k8s.io                        v1
coordination.k8s.io                      v1
node.k8s.io                              *v1,v1beta1
discovery.k8s.io                         *v1,v1beta1
flowcontrol.apiserver.k8s.io             *v1beta2,v1beta1
crd.projectcalico.org                    v1
# 创建Deployment
使用apps接口创建deployment,读取两个文件,一个是kubeconfig.yaml一个是模板nginx-deployment.yaml文件。
from os import path
import yaml
from kubernetes import client, config


def main():
    # Configs can be set in Configuration class directly or using helper
    # utility. If no argument provided, the config will be loaded from
    # default location.
    config.load_kube_config(r'kubeconfig.yaml')

    with open(path.join(path.dirname(__file__), "nginx-deployment.yaml")) as f:
        dep = yaml.safe_load(f)
        k8s_apps_v1 = client.AppsV1Api()
        resp = k8s_apps_v1.create_namespaced_deployment(
            body=dep, namespace="default")
        print("Deployment created. status='%s'" % resp.metadata.name)


if __name__ == '__main__':
    main()
运行后的输出如下:
Deployment created. status='nginx-deployment'
