 集群强化
集群强化
# 集群强化
# 主要内容
❖ K8s安全框架
❖ RBAC认证授权案例
❖ 资源配额 ResourceQuota
❖ 资源限制 LimitRange
# Kubernetes 安全框架
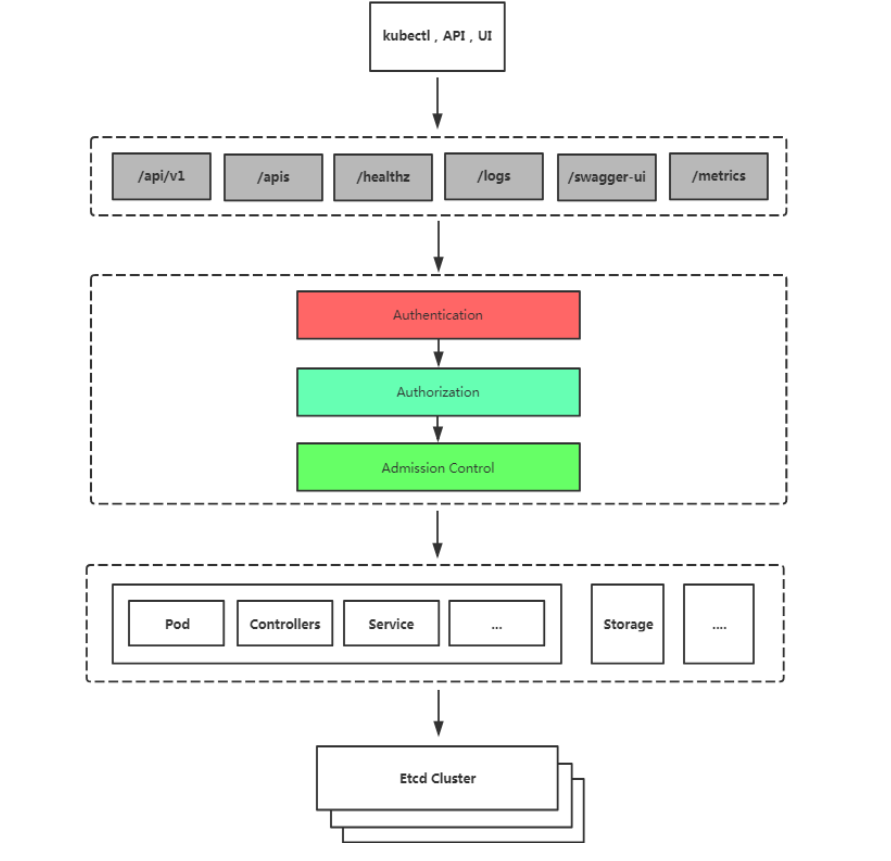
K8S安全控制框架主要由下面3个阶段进行控制,每一个阶段都支持 插件方式,通过API Server配置来启用插件。
Authentication(鉴权)Authorization(授权)Admission Control(准入控制)

# 鉴权(Authentication)
K8s Apiserver提供三种客户端身份认证:
- HTTPS 证书认证:基于CA证书签名的数字证书认证(kubeconfig)
- HTTP Token认证:通过一个Token来识别用户(serviceaccount)
- HTTP Base认证:用户名+密码的方式认证(1.19版本弃用)
# 授权(Authorization)
RBAC(Role-Based Access Control,基于角色的访问控制):负责完成授权(Authorization)工作。
RBAC根据API请求属性,决定允许还是拒绝。
比较常见的授权维度:
- user:用户名
- group:用户分组
- 资源,例如pod、deployment
- 资源操作方法:get,list,create,update,patch,watch,delete
- 命名空间
- API组
# 准入控制(Admission Control)
Adminssion Control实际上是一个准入控制器插件列表,发送到API Server的请求都需要经过这个列表中的每个准入控制器 插件的检查,检查不通过,则拒绝请求。
启用一个准入控制器:
$ kube-apiserver --enable-admission-plugins=NamespaceLifecycle,LimitRanger ...
关闭一个准入控制器:
$ kube-apiserver --disable-admission-plugins=PodNodeSelector,AlwaysDeny ...
查看默认启用:
$ kubectl exec kube-apiserver-k8s-master -n kube-system -- kube-apiserver -h | grep enable-admission-plugins
# 基于角色的权限访问控制:RBAC
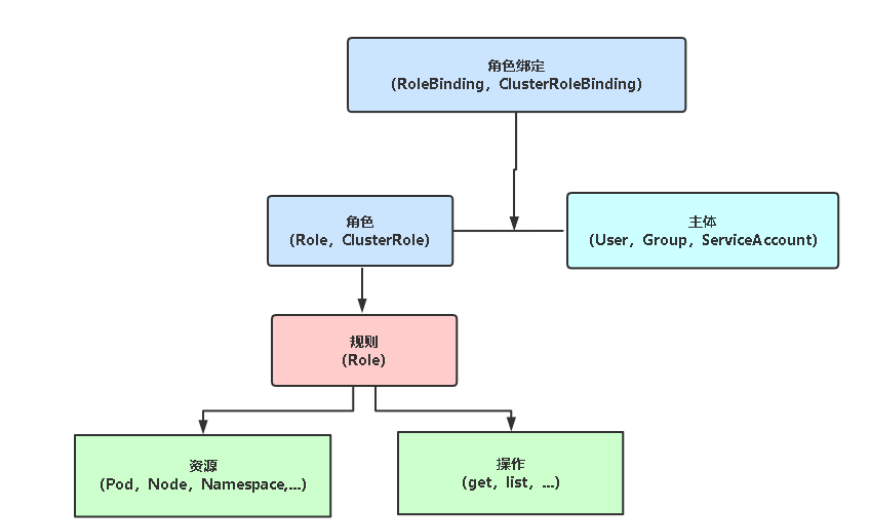
RBAC(Role-Based Access Control,基于角色的访问控制), 是K8s默认授权策略,并且是动态配置策略(修改即时生效)。
主体(subject)
- User:用户
- Group:用户组
- ServiceAccount:服务账号
角色
- Role:授权特定命名空间的访问权限
- ClusterRole:授权所有命名空间的访问权限
角色绑定
- RoleBinding:将角色绑定到主体(即subject)
- ClusterRoleBinding:将集群角色绑定到主体

注:RoleBinding在指定命名空间中执行授权,ClusterRoleBinding在集群范围执行授权。
# 基于角色的权限访问控制:RBAC
k8s预定好了四个集群角色供用户使用,使用kubectl get clusterrole查看,其中systemd:开头的为系统内部使用。
| 内置集群角色 | 描述 |
|---|---|
| cluster-admin | 超级管理员,对集群所有权限 |
| admin | 主要用于授权命名空间所有读写权限 |
| edit | 允许对命名空间大多数对象读写操作,不允许查看或者修改角色,角色绑定 |
| view | 允许对命名空间大多数对象只读权限,不允许查看角色、角色绑定和secret |
# 案例实施
# 案例1:对用户授权访问K8s(TLS证书)
需求:为指定用户授权访问不同命名空间权限,例如新入职一个小弟,希望让他先熟悉K8s集 群,为了安全性,先不能给他太大权限,因此先给他授权访问default命名空间Pod读取权限。 实施大致步骤:
用K8S CA签发客户端证书生成kubeconfig授权文件创建RBAC权限策略指定kubeconfig文件测试权限:kubectl get pods --kubeconfig=./aliang.kubeconfig
# 对用户授权访问K8s(TLS证书)
- 利用
cfssl工具生成证书 - 在当前的目录下会生成新的
TLS自签名证书
[root@master01:~/RBAC]# ./cert.sh
2022/04/12 02:42:42 [INFO] generate received request
2022/04/12 02:42:42 [INFO] received CSR
2022/04/12 02:42:42 [INFO] generating key: rsa-2048
2022/04/12 02:42:43 [INFO] encoded CSR
2022/04/12 02:42:43 [INFO] signed certificate with serial number 66521569005511148107562700581322500464829062465
2022/04/12 02:42:43 [WARNING] This certificate lacks a "hosts" field. This makes it unsuitable for
websites. For more information see the Baseline Requirements for the Issuance and Management
of Publicly-Trusted Certificates, v.1.1.6, from the CA/Browser Forum (https://cabforum.org);
specifically, section 10.2.3 ("Information Requirements").

[root@master01:~/RBAC]# ll
total 48
-rw-r--r-- 1 root root  997 Apr 12 02:42 aliang.csr
-rw-r--r-- 1 root root  219 Apr 12 02:42 aliang-csr.json
-rw------- 1 root root 1679 Apr 12 02:42 aliang-key.pem
-rw------- 1 root root 5759 Apr 12 02:44 aliang.kubeconfig
-rw-r--r-- 1 root root 1277 Apr 12 02:42 aliang.pem
-rw-r--r-- 1 root root  292 Apr 12 02:42 ca-config.json
-rwxr-xr-x 1 root root  741 Sep  1  2019 cert.sh
-rw-r--r-- 1 root root 1048 Jun 23  2021 k8s-api-test.py
-rwxr-xr-x 1 root root  622 Apr 12 02:41 kubeconfig.sh
-rw-r--r-- 1 root root  664 Jun 14  2021 python-pod-sa.yaml
# 生成kubeconfig授权文件
- 使用kubectl config命令生成新的授权文件
- 配置客户端认证以及配置集群上下文
[root@master01:~/RBAC]# kubectl config set-cluster kubernetes \
  --certificate-authority=/etc/kubernetes/pki/ca.crt \
  --embed-certs=true \
  --server=https://10.11.121.118:6443 \
  --kubeconfig=aliang.kubeconfig
Cluster "kubernetes" set.

#设置客户端认证
[root@master01:~/RBAC]# kubectl config set-credentials aliang \
  --client-key=aliang-key.pem \
  --client-certificate=aliang.pem \
  --embed-certs=true \
  --kubeconfig=aliang.kubeconfig
User "aliang" set.

#设置默认上下文
[root@master01:~/RBAC]# kubectl config set-context kubernetes \
  --cluster=kubernetes \
  --user=aliang \
  --kubeconfig=aliang.kubeconfig
Context "kubernetes" created.

#设置当前使用配置
[root@master01:~/RBAC]# kubectl config use-context kubernetes --kubeconfig=aliang.kubeconfig
Switched to context "kubernetes".
此时测试会发现报错
[root@master01:~/RBAC]# kubectl get pods --kubeconfig=aliang.kubeconfig
Error from server (Forbidden): pods is forbidden: User "aliang" cannot list resource "pods" in API group "" in the namespace "default"
# 创建RBAC策略
- 创建Role的名称为
pod-reader - 创建Role绑定
pods和services资源 - Role的权限为
get、watch、list - 绑定RoleBinding使用
User为aliang - 绑定RoleBinding的
Role为pod-preader
kind: Role
apiVersion: rbac.authorization.k8s.io/v1
metadata:
  namespace: default
  name: pod-reader
rules:
- apiGroups: [""]
  resources: ["pods","services"]
  verbs: ["get", "watch", "list"]

---

kind: RoleBinding
apiVersion: rbac.authorization.k8s.io/v1
metadata:
  name: read-pods
  namespace: default
subjects:
- kind: User
  name: aliang
  apiGroup: rbac.authorization.k8s.io
roleRef:
  kind: Role
  name: pod-reader
  apiGroup: rbac.authorization.k8s.io

[root@master01:~/RBAC]# kubectl apply -f rbac.yaml
role.rbac.authorization.k8s.io/pod-reader created
rolebinding.rbac.authorization.k8s.io/read-pods created
测试查看可以发现pods和service的资源可以使用用户访问。
[root@master01:~/RBAC]# kubectl get pods  --kubeconfig=aliang.kubeconfig
No resources found in default namespace.

[root@master01:~/RBAC]# kubectl get svc --kubeconfig=aliang.kubeconfig
NAME         TYPE        CLUSTER-IP   EXTERNAL-IP   PORT(S)   AGE
kubernetes   ClusterIP   10.96.0.1    <none>        443/TCP   4d23h
**用户组:**用户组的好处是无需单独为某个用户创建权限,统一为这个组名进 行授权,所有的用户都以组的身份访问资源。
例如:为dev用户组统一授权
- 将certs.sh文件中的aliang-csr.json下的O字段改为dev,并重新生成证 书和kubeconfig文件
- 将dev用户组绑定Role(pod-reader)
- 测试,只要O字段都是dev,这些用户持有的kubeconfig文件都拥有相 同的权限
# 案例2:对应用程序授权访问K8s (SA)
先了解下ServiceAccount,简称SA,是一种用于让程序访问K8s API的服务账号。
- 当创建namespace时,会自动创建一个名为default的SA,这个SA没有绑定任何权限
- 当default SA创建时,会自动创建一个default-token-xxx的secret,并自动关联到SA
- 当创建Pod时,如果没有指定SA,会自动为pod以volume方式挂载这个default SA,在容 器目录:
/var/run/secrets/kubernetes.io/serviceaccount
验证默认SA权限:
kubectl --as=system:serviceaccount:default:default get pods
需求:授权容器中Python程序对K8s API访问权限 实施大致步骤:
创建Role创建ServiceAccount将ServiceAccount与Role绑定为Pod指定自定义的SA进入容器里执行Python程序测试操作K8s API权限
# 创建Role
- 创建名称为
py-role的Role - 可访问资源为
pods - 对pods资源可执行
get、watch、list的权限
apiVersion: rbac.authorization.k8s.io/v1
kind: Role
metadata:
  namespace: default
  name: py-role
rules:
- apiGroups: [""]
  resources: ["pods"]
  verbs: ["get", "watch", "list"]
# 创建ServiceAccount
- 创建serviceaccount的名称为
py-role
apiVersion: v1
kind: ServiceAccount
metadata:
  name: py-k8s
# 将ServiceAccount与Role绑定
- 创建名称为
py-role的RoleBinding - 绑定默认命名空间的
py-k8s名称的sa - 绑定
py-role的Role
kind: RoleBinding
apiVersion: rbac.authorization.k8s.io/v1
metadata:
  name: py-role
  namespace: default
subjects:
- kind: ServiceAccount
  name: py-k8s
roleRef:
  kind: Role
  name: py-role
  apiGroup: rbac.authorization.k8s.io
# 创建绑定SA的Pod
- 创建名称为
py-k8s的Pod - 绑定SA认证为
py-k8s
apiVersion: v1
kind: Pod
metadata:
  name: py-k8s
spec:
  serviceAccountName: py-k8s
  containers:
  - image: python:3
    name: python
    command:
    - sleep
    - 24h
创建测试,并使用Python脚本通过访问SA的认证,连接K8S的apiserver。
[root@master01:~/RBAC]# kubectl apply -f python-pod-sa.yaml
serviceaccount/py-k8s created
role.rbac.authorization.k8s.io/py-role created
rolebinding.rbac.authorization.k8s.io/py-role created
pod/py-k8s created

[root@master01:~/RBAC]# cp k8s-api-test.py py-k8s:/opt/
[root@master01:~/RBAC]# kubectl exec -it py-k8s -- bash
root@py-k8s:/# pip install kubernetes
查看当前的脚本并运行查看结果:
root@py-k8s:/opt# cat k8s-api-test.py
from kubernetes import client, config

with open('/var/run/secrets/kubernetes.io/serviceaccount/token') as f:
     token = f.read()

configuration = client.Configuration()
configuration.host = "https://kubernetes"  # APISERVER地址
configuration.ssl_ca_cert="/var/run/secrets/kubernetes.io/serviceaccount/ca.crt"  # CA证书
configuration.verify_ssl = True   # 启用证书验证
configuration.api_key = {"authorization": "Bearer " + token}  # 指定Token字符串
client.Configuration.set_default(configuration)
apps_api = client.AppsV1Api()
core_api = client.CoreV1Api()
try:
    print("###### Deployment列表 ######")
  #列出default命名空间所有deployment名称
  for dp in apps_api.list_namespaced_deployment("default").items:
    print(dp.metadata.name)
except:
    print("没有权限访问Deployment资源!")

try:
    #列出default命名空间所有pod名称
    print("###### Pod列表 ######")
    for po in core_api.list_namespaced_pod("default").items:
    	print(po.metadata.name)
except:
    print("没有权限访问Pod资源!")

root@py-k8s:/opt# python3 k8s-api-test.py
###### Deployment列表 ######
没有权限访问Deployment资源!
###### Pod列表 ######
py-k8s
python
命令行使用:授权SA只能查看test命名空间控制器的权限
1.创建角色
$ kubectl create role role-test --verb=get,list \
--resource=deployments,daemonsets,statefulsets -n test
2.创建服务账号
$ kubectl create serviceaccount app-demo -n test
3.将服务账号绑定角色
$ kubectl create rolebinding role-test:app-demo \
--serviceaccount=test:app-demo --role=role-test -n test
4.测试
$ kubectl --as=system:serviceaccount:test:app-demo get pods -n test
# 资源配额 ResourceQuota
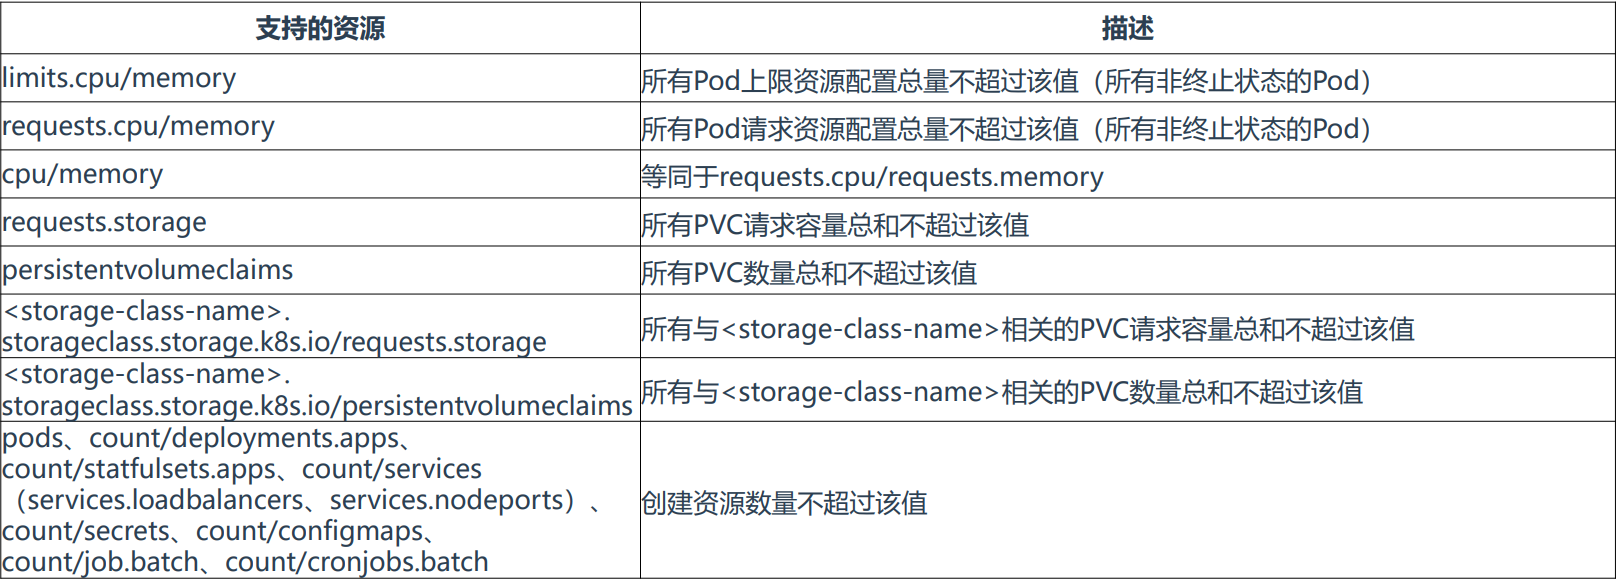
当多个团队、多个用户共享使用K8s集群时,会出现不均匀资源使用,默认情况下先到先得,这时可以通过 ResourceQuota来对命名空间资源使用总量做限制,从而解决这个问题。
使用流程:k8s管理员为每个命名空间创建一个或多个ResourceQuota对象,定义资源使用总量,K8s会跟踪命名空间 资源使用情况,当超过定义的资源配额会返回拒绝。
ResourceQuota功能是一个准入控制插件,默认已经启用。

# 命名空间资源配额
- 首先需要创建一个命名空间,我们对这个命名空间资源进行限制
- 创建Quota资源限制对test命名空间设置资源大小
[root@master01:~]# kubectl create ns test
namespace/test created
[root@master01:~]# cat  quota.yaml
apiVersion: v1
kind: ResourceQuota
metadata:
  name: compute-resources
  namespace: test
spec:
  hard:
    requests.cpu: "2"
    requests.memory: 4Gi
    limits.cpu: "4"
    limits.memory: 6Gi
执行yaml文件查看当前的quota资源使用情况:
[root@master01:~]# kubectl apply -f quota.yaml
resourcequota/compute-resources configured
[root@master01:~]# kubectl get quota -n test
NAME                AGE     REQUEST                                     LIMIT
compute-resources   8m43s   requests.cpu: 0/2, requests.memory: 0/4Gi   limits.cpu: 0/4, limits.memory: 0/6Gi
创建Deployment并且使用三个副本数,使用资源配额:
apiVersion: apps/v1
kind: Deployment
metadata:
  creationTimestamp: null
  labels:
    app: nginx
  name: nginx
spec:
  replicas: 3
  selector:
    matchLabels:
      app: nginx
  strategy: {}
  template:
    metadata:
      creationTimestamp: null
      labels:
        app: nginx
    spec:
      containers:
      - image: nginx
        name: nginx
        resources:
          limits:
            cpu: 500m
            memory: 512Mi
          requests:
            cpu: 256m
            memory: 256Mi
再次查看当前的资源使用情况:
[root@master01:~]# kubectl get pods -n test
NAME                     READY   STATUS    RESTARTS   AGE
nginx-646967b68d-cpwlt   1/1     Running   0          11m
nginx-646967b68d-gfz6h   1/1     Running   0          11m
nginx-646967b68d-lz5hp   1/1     Running   0          11m

[root@master01:~]# kubectl get quota -n test
NAME                AGE   REQUEST                                            LIMIT
compute-resources   22m   requests.cpu: 768m/2, requests.memory: 768Mi/4Gi   limits.cpu: 1500m/4, limits.memory: 1536Mi/6Gi
# 对象数量配额
- 配置test命名空间下的对象数量配额
- 控制deployment的数量在3个
- 控制services的数量在3个
- 控制pods的数量为4个
apiVersion: v1
kind: ResourceQuota
metadata:
  name: count-quota
  namespace: test
spec:
  hard:
    pods: "4"
    count/deployments.apps: "3"
    count/services: "3"

[root@master01:~]# kubectl get quota -n test
NAME          AGE   REQUEST                                                       LIMIT
count-quota   49s   count/deployments.apps: 0/3, count/services: 0/3, pods: 0/4
创建Deployment的副本数为2个:
[root@master01:~]# kubectl create deployment nginx --image=nginx --replicas=2 -n test
deployment.apps/nginx created
[root@master01:~]# kubectl get  pods -n test
NAME                     READY   STATUS    RESTARTS   AGE
nginx-6799fc88d8-gcnqv   1/1     Running   0          6s
nginx-6799fc88d8-vhttg   1/1     Running   0          6s
此时查看当前的限制使用情况:
[root@master01:~]# kubectl get quota -n test
NAME          AGE    REQUEST                                                       LIMIT
count-quota   2m2s   count/deployments.apps: 1/3, count/services: 0/3, pods: 2/4
现在我们将Deployment的副本数扩容到5个副本看看会发生什么:
Deployment的副本数并没有扩容到4当前的quota限制里,Deployment的资源耗尽
[root@master01:~]# kubectl scale deployment nginx --replicas=5 -n test
deployment.apps/nginx scaled

[root@master01:~] # kubectl get pods -n test
NAME                     READY   STATUS    RESTARTS   AGE
nginx-6799fc88d8-2nkjg   1/1     Running   0          21s
nginx-6799fc88d8-fnmhj   1/1     Running   0          21s
nginx-6799fc88d8-gcnqv   1/1     Running   0          71s
nginx-6799fc88d8-vhttg   1/1     Running   0          71s

[root@master01:~]# kubectl get quota -n test
NAME          AGE   REQUEST                                                       LIMIT
count-quota   3m    count/deployments.apps: 1/3, count/services: 0/3, pods: 4/4
# 资源限制 LimitRange
默认情况下,K8s集群上的容器对计算资源没有任何限制,可能会导致个别容器资源过大导致影响其他容器正常工 作,这时可以使用LimitRange定义容器默认CPU和内存请求值或者最大上限。
LimitRange限制维度:
- 限制容器配置
requests.cpu/memory,limits.cpu/memory的最小、最大值 - 限制容器配置
requests.cpu/memory,limits.cpu/memory的默认值 - 限制PVC配置
requests.storage的最小、最大值
# 计算资源大小限制
- 创建一个LimitRange的资源
- 设置cpu最小能设置为
200m,最大1个 - 设置内存最小能设置为
200Mi,最大1Gi - 低于最小的请求或者超过最大的请求将会报错
apiVersion: v1
kind: LimitRange
metadata:
  name: cpu-memory-min-max
  namespace: test
spec:
  limits:
  - max: # 容器能设置limit的最大值
      cpu: 1
      memory: 1Gi
    min: # 容器能设置request的最小值
      cpu: 200m
      memory: 200Mi
    type: Container
创建一个Pod查看资源使用情况:
[root@master01:~/work]# kubectl apply -f pod.yaml
pod/nginx created
[root@master01:~/work]# cat pod.yaml
apiVersion: v1
kind: Pod
metadata:
  name: nginx
  namespace: test
spec:
  containers:
  - image: nginx
    name: nginx
    resources:
      limits:
        cpu: 500m
        memory: 256Mi
      requests:
        cpu: 300m
        memory: 200Mi
查看当前的资源限制状态:
[root@master01:~/work]# kubectl describe limitranges -n test cpu-memory-min-max
Name:       cpu-memory-min-max
Namespace:  test
Type        Resource  Min    Max  Default Request  Default Limit  Max Limit/Request Ratio
----        --------  ---    ---  ---------------  -------------  -----------------------
Container   cpu       200m   1    1                1              -
Container   memory    200Mi  1Gi  1Gi              1Gi            -
尝试创建一个超过大小的Pod,将以上Pod改成最大请求2Gi内存和2个CPU:
提示报错警告不能超过最大请求所以资源限制生效
[root@master01:~/work]# kubectl apply -f pod.yaml
Error from server (Forbidden): error when creating "pod.yaml": pods "nginx" is forbidden: [maximum cpu usage per Container is 1, but limit is 2, maximum memory usage per Container is 1Gi, but limit is 2Gi]
# 计算资源默认值限制
- 创建LimitRange资源
- 设置默认的内存限制
最小300m,最大500m - 设置默认的cpu限制最
小300m,最大500m
apiVersion: v1
kind: LimitRange
metadata:
  name: cpu-memory-min-max
  namespace: test
spec:
  limits:
  - default:
      cpu: 500m
      memory: 500Mi
    defaultRequest:
      cpu: 300m
      memory: 300Mi
    type: Container
创建资源限制查看当前的状态:
[root@master01:~/work]# kubectl describe limitranges -n test cpu-memory-min-max
Name:       cpu-memory-min-max
Namespace:  test
Type        Resource  Min  Max  Default Request  Default Limit  Max Limit/Request Ratio
----        --------  ---  ---  ---------------  -------------  -----------------------
Container   memory    -    -    300Mi            500Mi          -
Container   cpu       -    -    300m             500m           -
创建Pod测试,不需要设置当前Pod的资源请求部分,创建之后查看:
[root@master01:~/work]# cat pod.yaml
apiVersion: v1
kind: Pod
metadata:
  name: nginx
  namespace: test
spec:
  containers:
  - image: nginx
    name: nginx

[root@master01:~/work]# kubectl describe pods -n test | grep Limits -A 5
    Limits:
      cpu:     500m
      memory:  500Mi
    Requests:
      cpu:        300m
      memory:     300Mi
# 存储资源最大、最小限制
- 创建LimitRange资源
- 设置最小的申请PVC限制
最小为1Gi,最大10Gi
apiVersion: v1
kind: LimitRange
metadata:
  name: storage-min-max
  namespace: test
spec:
  limits:
  - type: PersistentVolumeClaim
    max:
      storage: 10Gi
    min:
      storage: 1Gi
此资源在PVC中使用如下:
apiVersion: v1
kind: PersistentVolumeClaim
metadata:
  namespace: test
  name: pvc-quota-demo2
spec:
  storageClassName: manual
  accessModes:
    - ReadWriteOnce
  resources:
    requests:
      storage: 1Gi
